Showing posts with label Prismacolor Markers. Show all posts

Monday, March 20, 2017

The Sun Will Come Out Tomorrow - Get Well Card!

Hello! Karla here today to share a cute get well card with you, and since it is officially Spring I thought the PCS Rain Or Shine clear stamp set would be the perfect thing to use! I recently went through all my patterned paper and found this cute umbrella paper in my stash - it immediately made me think of this adorable stamp set!

I stamped the umbrella on some patterned paper and used my Prismacolor and Hobby Colour Markers to add some colour to the edges and handle before popping up with foam dots.  I really love the font on 'The Sun Will Come Out Tomorrow' sentiment from the set!

I've been playing around with my new Distress Oxide Inks and created a background with some fun splatters! These inks are awesome!! I used my CTMH oval cutting system to cut out a piece of the background along with a black mat. I love the way the sunshine stamp in the Rain Or Shine stamp set peeks out from behind the umbrella! I added some yellow marker colour on the sun and then dropped some Glossy Accents over the oval and umbrella to look like rain drops.

I tied a pretty blue silk ribbon and added my favourite sequins from SpiegelMom Scraps!

I love all the fun sentiments in this set - and this was perfect for my get well card, and these little rubber boots are so adorable with a matching paper pieced print!

Doesn't this card just make you feel happier?!! I know it makes me smile :)

Here's a look at this cute set:
 Rain Or Shine 

Thanks so much for stopping by! I hope things are sunny for you this week <3


Wednesday, February 22, 2017

Llama Happy Birthday!

Hey there friends! Karla here today with a cute llama birthday card that I made for my daughter using the Little Llama clear stamp set. She turned 10 in January and made a special request for this llama wearing a sombrero to be on her card! I used my Prismacolor and Hobby Colour Markers, which are alcohol based to colour in this adorable llama and her pretty hat, which I popped up with foam dots. I thought I'd use the fun and festive BoBunny Believe papers from a 6x6 pad along with some pretty sequins.

I layered the sentiment from the set over a banner shape and added some hand drawn stitch lines.

Inside, I used the Happy Birthday sentiment and a couple hearts from the set - and since I forgot to take a pic before writing a sweet message to my girl I thought I'd share that with you too! I always make sure I add the date in the card so she'll be able to see when she got it.

Here's a look at this super cute set - with lots of sentiments for different occasions!
Little Llama
Thanks so much for stopping by today! I hope your week is looking fabulous!!


Monday, September 26, 2016

Two Baby Cards and a Video!

Happy Monday friends! Karla here today with two baby cards and a video on my new YouTube Channel,to go along with them! I haven't had any baby cards to make for a long time, and I needed two recently. My hairdresser is having a baby boy, and my youngest sister is having a baby girl - yay!! Such exciting times, and I had some great ideas for combining digital and clear stamps to create these cute cards that I wanted to try out.

 I first used the Special Delivery sentiment from the Pen Pals stamp set inside word bubbles from the Let's Talk stamp set and stamped on watercolour paper. I used my Tim Holtz Distress Crayons to watercolour my bubbles by scribbling on my craft sheet and then using a paintbrush to dab on the colour mixed with a bit of water. For the boy card I used blue and green, and then for the girl card I used a red and pink crayon.

I coloured the adorable gator from the Birthday Gator digital stamp set with Prismacolour and Hobby Colour markers, both alcohol based and layered him over some of the awesome papers from the Shimelle StarShine Collection.

I found this sweet little soother button in my stash and added it to my tag along with some shiny metallic thread. A bit of Distress Ink around the edges adds some colour.

I used a Spellbinders die to cut the star shaped diecut background and added some pretty sequins.

For my second baby card I used the super sweet elephant from the Birthday Elephant digital stamp set and coloured her pink and then used some white gel pen to add some pretty details.

I used some more of those cute buttons and layered them on some twisted metallic thread in blue and red to match my card. I love the colours in this StarShine collection!

There are so many cards I could use this elephant on - and she'd look good in any colour!

Here's a look at all the awesome sets I've used:

Birthday Elephant

Birthday Gator 

Let's Talk

Pen Pals
You can check out the video I created to show you how I made these cards here! 

Thank you so much for stopping by! Don't forget to check out this month's New Releases from Pretty Cute Stamps and the current challenge using Polka Dots!! Have a very happy, very crafty week!


Monday, August 1, 2016

Birthday Splash!

Hey there friends!! Karla here today. I hope you enjoyed a wonderful weekend. We had sunshine and rain- but we managed to get out a bit, and even slept in the tent in our backyard Saturday night. The kids loved it, but I don't know if I'd say tenting is my favourite thing, lol.

Today I'm sharing this adorable Mermaid Kisses Digital Stamp set from the Pretty Cute Stamps store that I used to create this card. I opened the mermaid digital stamp in PicMonkey, a free online photo editing program and layered on the present and sentiment before colouring in the background with alcohol based markers.  You could also print out your images and layer them as you wish. Check out the TUTORIAL I created here to show you how easy this is!

I added Stickles and sequins and then edged my oval with Versamark and silver embossing powder to add lots of shiny sparkly fun!

Inside, I used the sentiment from the Merman Digital Stamp set. 

Here's a look at the digital stamp sets I used: 

Mermaid Kisses Digital Stamp set

Merman Digital Stamp set

Thank you so so much for joining me today! Don't forget this month's challenge is still going on - By The Sea! You still have time to enter for a chance to win a gift certificate. Have an awesome, crafty week! 


Monday, June 27, 2016

Mermaid Card With Digital Stamp Layering Tutorial!

Hi Friends! Karla here, and I hope you all had a lovely weekend. We had a lot of rain and even a little hail this weekend, but you gotta take the rain with the shine right! I'm sharing a card I made with the new Mermaid Kisses Digital Stamp this month from Pretty Cute Stamps. If you haven't checked them out you'll be amazed! They are so darn cute, and so fun to work with!!


I used some pretty papers from the Boardwalk Collection from BoBunny and layered on my printed and coloured image from the Mermaid Kisses digital stamp set. Alcohol based markers, such as Copics or Prismacolor markers, work well with injet printers. I even added some Stickles and Gelly Roll pens to my project after colouring to add some shimmer.


Inside, I added this adorable sentiment, included in the set!

I've put together a bit of a tutorial to show you how easy it is to print out a layered image using PicMonkey - a free photo editing program you open in your browser - no downloading required.

1. Open PicMonkey and choose EDIT at the top of the screen. A box will pop up allowing you to choose your JPEG image from the images you've downloaded from Pretty Cute Stamps. For this card, I chose the Lounging Mermaid. This opens it on your screen.

2. To the left of your screen you now see the Editor and you can add the stamps you want to overlay. Choose the Butterfly icon which opens Overlays and choose 'Your Own' at the top of the screen. This opens the file folder you just opened the mermaid from.

3. Choose the digital stamp you want to overlay - in the PNG format. I chose the present file - click Open.

4. This opens the digital stamp onto your background (Mermaid). You can resize your image by placing your mouse cursor at one of the corners and making it as small or large as you wish. You can even change the colour and turn your image!

5. I made my present smaller and placed it on her hand as if she was holding it. For my actual card you can see I put a cupcake in her hand and added two layered presents in different sizes at the bottom.

7. You can even add a sentiment directly to the image! When you have your image just the way you want it you can save it by clicking Save at the top of the screen, then Save To My Computer on the left of the screen. MAKE SURE TO SAVE YOUR FILE AS A DIFFERENT NAME THOUGH so you don't overwrite the original file!

Now you can print your file from your computer, colour and enjoy!! Think how cute this image would be printed in a larger size and framed!

Here's a look at this cute digital stamp set!!
Mermaid Kisses

Thanks so much for stopping by today! I hope you'll check out all the super awesome stamps available at Pretty Cute Stamps and don't forget about our Summertime Challenge - where you could win a gift certificate just for sharing what you create with your PCS stamps and digital stamps!


Monday, March 28, 2016

Happy Easter Cuties Cards!

I hope everyone enjoyed a very lovely Easter! Karla here today, and our family is having Easter dinner today, so I thought I'd share these cute cards I made for my daughter's preschool teachers using the adorable Easter Cuties stamps from Pretty Cute Stamps!

I used some pretty spring papers as my background and layers and then stamped my images on white cardstock circles before colouring with alcohol based markers. I masked some of my images and fussy cut around the parts that extended outside the circle. I just hand drew in a line for the grass and added a bit of marker shading. The little paintbrush is from the School Planner stamp set, which was just the perfect size for these cuties! I always love finding new ways to combine elements of the stamp sets that I have. There are a few more small icons in these planner sets that would also be perfect accents!

Here I used the mix and match sentiments in the Easter Cuties set to decorate the insides and envelopes of my cards. My daughter was very excited to give these to her teachers!

I hope you are enjoying your Easter Monday! Be sure to check out our current challenge, Anything But A Card! Have an awesome week :)


Monday, March 9, 2015

Let's Do Sushi!

Happy Monday! Karla here today with two amazing new sets from Pretty Cute Stamps ! Every time I stamp with these awesome stamps I totally start craving sushi!! One of my favourite treats ;) I just had to show you how fabulous they go together.

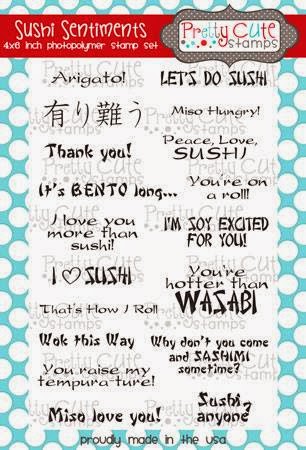
I used the Got Sushi stamp set to stamp all my sushi, wasabi and chopsticks - I just can't get over how cute these guys are!! The images are coloured with Prismacolor Markers and I popped a couple images up with pop dots to give dimension. I created the background with a Tim Holtz stencil and used some of his new Pistachio ink along with another green distress ink to blend a pretty background. I then used a sentiment from the Sushi Sentiments set along with the lettering that means Sushi from the first set.


I simply had to make a second card using another new Tim Holtz stencil I recently got. I have to say this is my fav!! I love the pretty flowers in the background and the adorable Got Sushi images! There are just so many occasions to use these stamp sets for!


Thanks so much for joining me today, and be sure to check out all the exciting stamps at the Pretty Cute Stamps store!